Thursday, February 26, 2015

making the crop ratio simple

While my world of photography sometimes looks as if I click a button, load some images, do a few computer tricks, and reveal the magic, I can assure you there is much more to it. One large part of this job is math. *insert tears and temper tantrums*

I hate math. I'm no good at it. It takes way too much time and concentration and I have neither. It blows my mind how some people are just born with this type of brain. My youngest is a math guru and thrives on speaking numbers...vomit. My brother can pretty much solve any mathematical equation given to him and, get this, he thinks it's FUN. That's not me. That gene broke off before entering my body. I'm the kid who could come home with a "simple" math worksheet in middle school and spend the rest of the night sobbing and hating my life (part of that is just middle school, but yea).

Seeing as how this math part of life is now my reality (although I attempted to dodge all areas related), I want to try to explain cropping images to those of you who think like me.

Have you ever taken a photo, tried to enlarge it to an 8x10, only to have it come back from the printer with a giant white border around it? Obnoxious, right? And you can't figure it out, right? It all has to do with ratios. Do you know what I'm not good with? Ratios. My brain doesn't read them (no sarcasm here). So when someone tries to explain this problem to me in ratio terms, I shut down. I can't be the only one out there with this issue, which is why I feel the need to try to explain it better. You can Google for days (I have) and you will not come up with this explanation. I truly hope I'm helping someone else out there with this same problem!

When I (or you) take a photo, it is shot in camera as a 4x6. That makes sense, right? 4x6's are the typical "photo album" size. We're talking inches now instead of ratios. I can stand behind that. 

You go to enlarge your 4x6 original to an 8x10 thinking it will just get bigger, only to find out you are either stuck with that obnoxious white border, or you can cut into the picture, possibly losing limbs, part of a head, or lots of details from the original. Here's why...

*Brace yourself. Equations are coming*

If shot as a 4x6, you have to enlarge in the same format to keep all of the image. So you would enlarge as follows: 

4x2=8 and 6x2=12 (The 2 is because we are doubling the size. You can insert whichever number you'd like here depending on how large you want your final image.)

So in doubling the size of a 4x6, you end up with an 8x12. Have you ever tried shopping for an 8x12 frame. I have. I ended up having to custom order it. Blech.  What you will find an abundance of would be the 8x10 frames. Millions of them. But you have to chop 2 inches off your image now to make it fit. OR, have it printed with the ugly border.

See the images below for the visual piece of this topic.
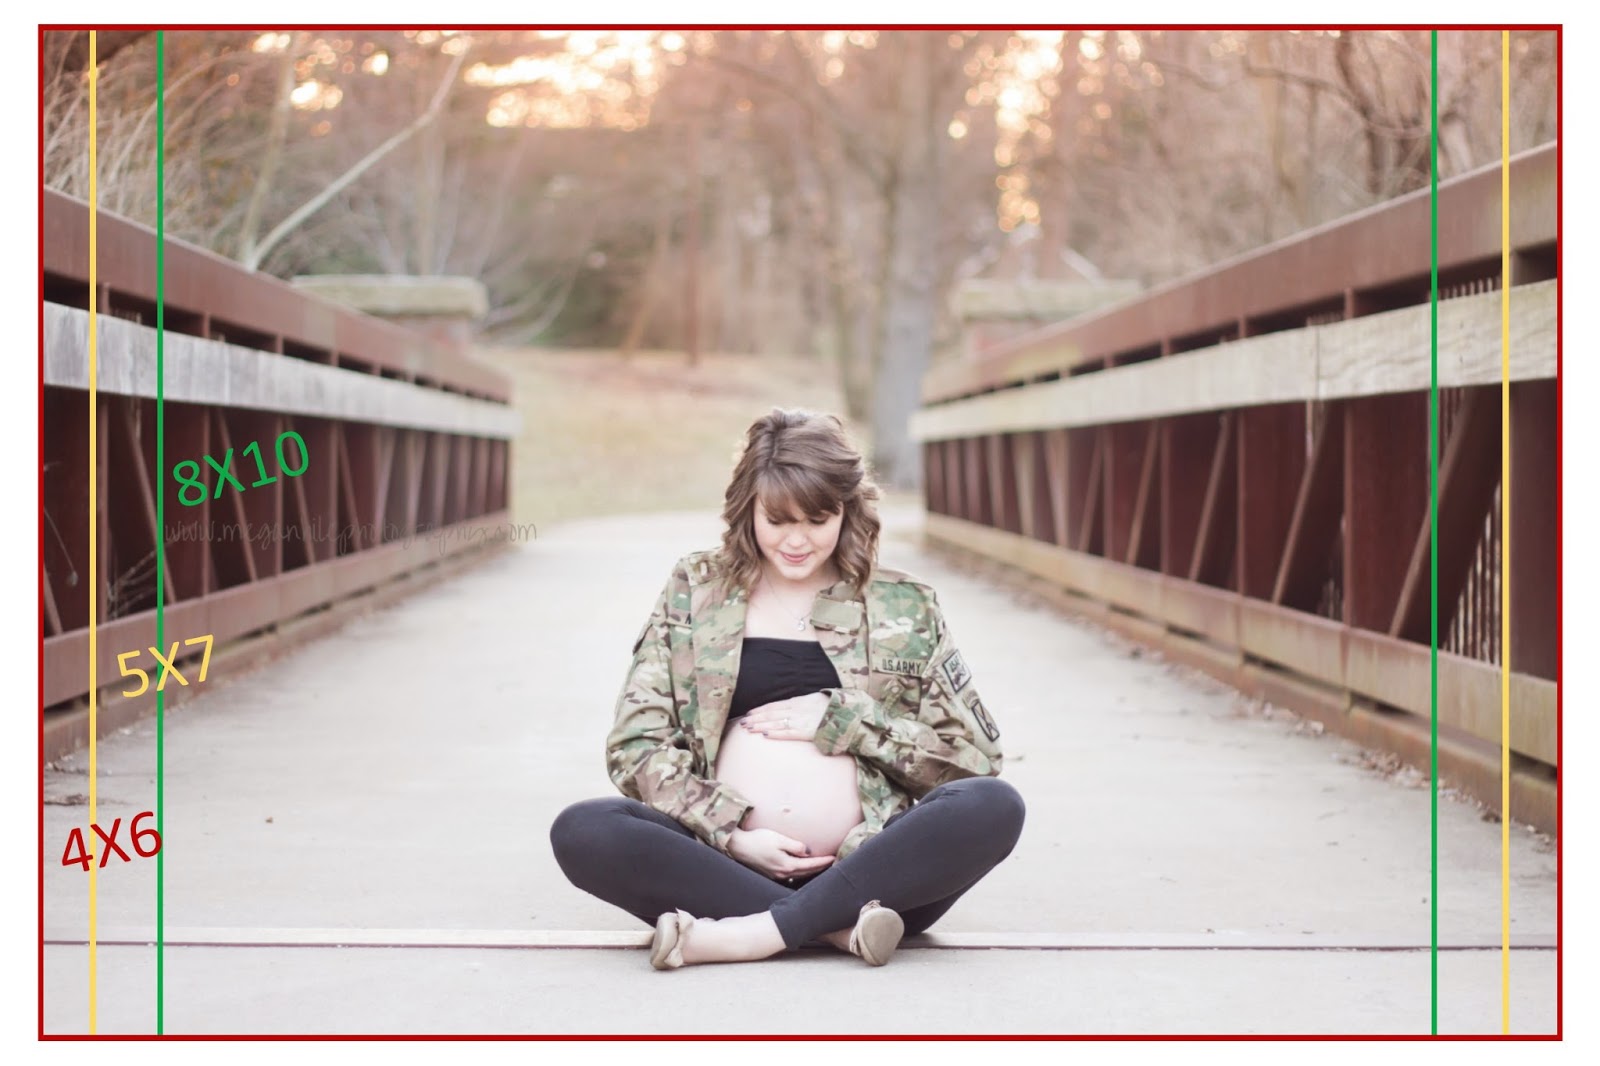
Since I shot this with plenty of room, there is no problem with cropping/enlarging to any size I need. It simply takes a bit of the background, but still leaves my breathtakingly gorgeous subject.


If you are really wanting to enlarge an image but you are risking cutting off vital pieces of the image, simply do the math again until you find a size that will fit in a frame you're happy with. I'll give you a hit:

The next size up is a 16x24 ;)

Now when shooting, think about these equations and do yourself a favor. Take a step back. Open up the space between you and your subject so that you don't lose the awesome detail of that image, and you can enlarge in whatever way you wish.


Cheers!

-XX-

Megan


Monday, February 23, 2015

Before and After

I rarely do before and after reveals. I never like to share my work when it's not "perfect". I never thought of myself as 'Type A' but I am. I'll embrace it now that I've come to the realization. If it's not to my standards, you won't see it. Simple as that. Maybe it's an artist thing? Maybe it's just me? Either way, the struggle is real over here!

In order to break my routine and reach out to help other aspiring photographers, it just has to happen. I must show where my work begins and where it ends.

All of the following images were shot in RAW format. When people hear 'RAW', they typically think this just means the original shot out of the camera before editing. This is not the case. RAW is a specific file type, just like a jpeg, pdf, or gif. When shooting in RAW, an entirely new world of possibilities opens up in editing. To me, it is the difference between molding Play-doh that has sat out over night and molding a fresh, brand new can. If you are wanting more detail on this, please hit up Google. You'll find an endless amount of info written by people who can explain it much better than I can!

I only edit in Lightroom. I own Photoshop, but never touch it. Never. I have no need to use it. I strive to perfect my images in camera (Type A, remember?), and then do simple, soft edits in Lightroom (and sometimes a little booger and drool removal).

Over the years, I have created several one-click presets, as well as a handful of brushes. These tools help me work quickly and efficiently, as well as set my work apart from every other photographer's work. Eventually, I will bundle all of these presets and brushes and sell them to beginning photographers. You'll be the first to know when that day arrives! Until then, enjoy! And please feel free to ask questions!

Cheers!


SOOC RAW - One Click Color Edit - One Click B&W Matte Edit

SOOC RAW - One Click Color Edit + Spring Brush - One Click B&W Matte Edit

SOOC RAW - One Click Color Edit + Soft Matte Brush - One Click B&W Matte Edit

SOOC RAW - One Click Color Edit + Spring Brush + Sunset Brush - One Click B&W Matte Edit

SOOC RAW - One Click Color Edit + Sunset Brush - One Click B&W Matte Edit

SOOC RAW - One Click Color Edit + Spring Brush + Sunset Brush - One Click B&W Matte Edit


-XX-

Megan

Sunday, February 22, 2015

The Hunt For Perfection

I have officially been in business since 2011, however I did my fair share of research before I opened shop. I have continuously shopped for *the* very best products to both fit my branding, and offer my amazing clients. Over the years, there has just been something lacking in my prints. I'm never completely satisfied when those shipments hit my door. I just wanted something more. I knew it was out there, or that eventually someone would be developing the exact thing I was needing for my business. So I kept shopping. I kept developing. I hunted and ordered and purchased and hunted some more.

Last week, it happened. A brand new company just formed. They knew exactly what the photography world had been lacking. They did their research, developed their product, and have created the most gorgeous, breathtaking pieces to have ever hit my porch. The colors, the textures, the richness and details have left me in awe of my own work, and this is a rarity.

So now, my product line for 2015 and beyond is complete. Just wait until you hold them in your hands.